
Anker PowerCor

旅行には必須の大容量モバイルバッテリー!
モンスターエナジー 355ml×24本 [エナジードリンク]

脳を活性化させるにはこれ!
ドラゴンクエスト メタリックモンスターズギャラリー メタルキング
みんな大好き経験値の塊をデスクに常備しておこう!
Bauhutte ( バウヒュッテ ) 昇降式 L字デスク ブラック BHD-670H-BK

メインデスクの横に置くのにぴったりなおしゃれな可動式ラック!
BANDAI SPIRITS ULTIMAGEAR 遊戯王 千年パズル 1/1スケール

もう一人の僕を呼び覚ませ!!
MOFT X 【新型 ミニマム版】 iPhone対応 スマホスタンド

Amazon一番人気のスマホスタンド!カード類も収納出来てかさ張らないのでオススメです!
サンディスク microSD 128GB

スマホからSwitchまで使える大容量MicroSDカード!
スポンサーリンク
目次
フォームのポストをボタンによって動的に切り替えたい
JavaScriptで上書きするのが一般的だった
HTMLでフォームを作成している場合、要件によっては通常のサブミットとは別のURLにフォーム内容を送信したい場合があると思います。
そんなとき、今までは以下のようにjQueryなどのJavaScriptを使ってボタンが押下された際にformのURLを動的に書き換えた上でsubmitする、といった方法が一般的でした。
|
1 2 3 4 5 6 7 8 9 10 11 12 13 14 15 16 17 18 19 20 |
... (略) ... <form method="post"> ... (略) ... <button type="button" onclick="formSubmit('./draft.html')">下書き</button> <button type="button" onclick="formSubmit('./create.html')">作成</button> </form> ... (略) ... function formSubmit(url) { $('form').attr('action', url); $('form').submit(); } ... (略) ... |
HTML5の登場により1行追加するだけで実現可能
しかしそんな話も過去の話。
なんと、HTML5にて追加されたbutton要素のformaction属性を利用することでJavaScriptを一行も書く必要なく同様の処理が可能になったのです!
Definition and Usage
The formaction attribute specifies where to send the form-data when a form is submitted. This attribute overrides the form’s action attribute.The formaction attribute is only used for buttons with type=”submit”.HTML button formaction Attribute
サポートしているブラウザ等は公式サイトを見ていただければなと思います。
では、実際に試してみましょう!
やり方
サンプルコード
今回は以下のようなフォームを用意し、下書きボタンを押下した際にのみ、formのaction属性を上書きするようにしてみようと思います。
|
1 2 3 4 5 6 7 8 9 10 11 12 13 14 15 16 17 18 19 20 21 22 23 24 25 |
<!DOCTYPE html> <html> <head> <meta http-equiv="X-UA-Compatible" content="IE=edge"> <title>登録フォーム</title> <meta charset="utf-8"> <meta name="description" content=""> <meta name="author" content=""> <meta name="viewport" content="width=device-width, initial-scale=1"> <link rel="stylesheet" href=""> <link rel="shortcut icon" href=""> </head> <body> <h1>フォーム</h1> <form method="POST" action="./create.html"> <p> <input type="submit" value="下書き" formaction="./draft.html" /> <input type="submit" value="作成" /> </p> </form> </body> </html> |
|
1 2 3 4 5 6 7 8 9 10 11 12 13 14 15 16 17 18 19 |
<!DOCTYPE html> <html> <head> <meta http-equiv="X-UA-Compatible" content="IE=edge"> <title>作成完了</title> <meta charset="utf-8"> <meta name="description" content=""> <meta name="author" content=""> <meta name="viewport" content="width=device-width, initial-scale=1"> <link rel="stylesheet" href=""> <link rel="shortcut icon" href=""> </head> <body> <h1>作成完了</h1> </body> </html> |
|
1 2 3 4 5 6 7 8 9 10 11 12 13 14 15 16 17 18 19 |
<!DOCTYPE html> <html> <head> <meta http-equiv="X-UA-Compatible" content="IE=edge"> <title>下書き完了</title> <meta charset="utf-8"> <meta name="description" content=""> <meta name="author" content=""> <meta name="viewport" content="width=device-width, initial-scale=1"> <link rel="stylesheet" href=""> <link rel="shortcut icon" href=""> </head> <body> <h1>下書き完了</h1> </body> </html> |
確認
では、実際に動かしてみましょう。
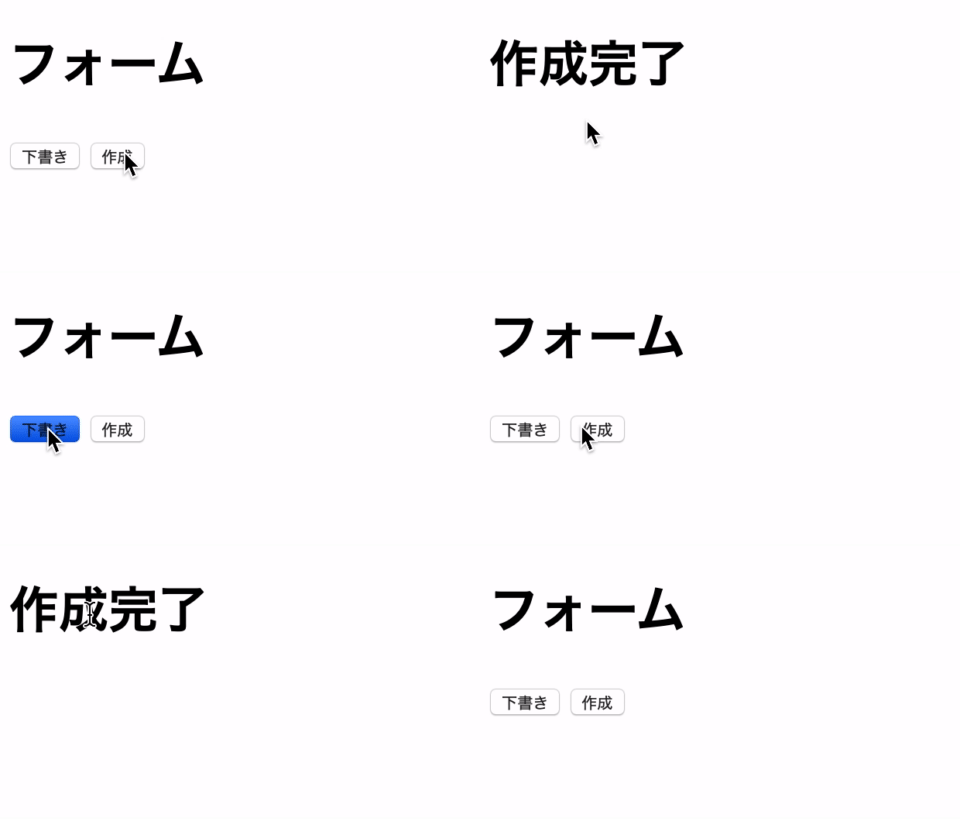
期待通りの動きがJavaScript無しで実現出来ましたね!
これは簡単かつ便利過ぎる・・・!
formタグにactionが無くても問題ない
また、以下のようにformタグにaction属性をつけなくても問題ありません。
|
1 2 3 4 5 6 7 8 9 10 11 12 13 14 15 16 17 18 19 20 21 22 23 24 25 |
<!DOCTYPE html> <html> <head> <meta http-equiv="X-UA-Compatible" content="IE=edge"> <title>登録フォーム</title> <meta charset="utf-8"> <meta name="description" content=""> <meta name="author" content=""> <meta name="viewport" content="width=device-width, initial-scale=1"> <link rel="stylesheet" href=""> <link rel="shortcut icon" href=""> </head> <body> <h1>フォーム</h1> <form method="POST"> <p> <input type="submit" value="下書き" formaction="./draft.html" /> <input type="submit" value="作成" formaction="./create.html" /> </p> </form> </body> </html> |
その場合は必ずbuttonタグにsubmitaction属性を記述するようにしてください。
お好みのやり方で試してみてください♪
終わりに
以上のように、HTML5の新しい属性のおかげでとても簡単に実装出来ました!
他にもHTML5の新機能で便利なものがあるので、気になる方は調べてみてください♪












 Travenist

 Otakenist