
PR この記事には広告(アフィリエイトリンク)が含まれています。 詳細
自動でワット金策をしたい!
育成環境の緩和に感謝
皆さんはポケモン剣盾やってますか?
ポケモン大好き人間の筆者は相変わらず好きなポケモンを厳選してはカジュアルバトルにて対戦をして楽しんでいます。
今作ではミントによって性格を変えたり、教え技は後から覚えられたり、前作に引き続きおうかんによって個体値も簡単にVにする事が出来るためとても簡単に育成をする事が出来ます♪
ただ、育成の一番のキモでもある努力値ですが、こちらもタウリンやブロムヘキシンなどのドーピングアイテムにより252まで簡単に一気に割り振る事が出来ることになったのもとても大きいですね。
膨大なお金が必要
しかし、ドーピングアイテムによる限界値までの投与が可能になった分、金策の重要性が上がりました。。。
キョダイマックスニャースによる金策も、1周約15分で約36万円、さらに常にコマンド操作をしなければいけない点とゴーストタイプ使いのウェイ君が来た時点でその試合ではキョダイマックスによる金策が無効化されるのがとてもメンタル的に疲れます。笑
巷で見つけた自動化を試してみる
そこで今回は有名な時渡りによるワットバグを用いた金策をマイコンによるSwitch自動操作と合わせて放置でひたすらワットを稼ぐ方法を実際に試してみようと思います。
Arduino IDEを使う方法だったり、pythonを使う方法だったり色々試してみましたが、個人的に今回紹介する方法が一番簡単だったのでご紹介します♪
やり方
前提
今回ご紹介する方法については、プログラムのミスやバージョン、その他予期せぬ原因によって、セーブデータや本体、その他機器に問題が発生する可能性があります。
お試しの際は必ず自己責任でお願いします!
また、時渡りによるワットバグについては本記事では説明を割愛しますので、各自で調べてみてください。
事前に購入しておく物
今回は以下の機器を使用するので事前に用意しておいてください。
プレイズ Arduino UNO R3 互換基板 ATmega328P ATmega16U2
こちらがマイコンになります。
こちらに自動操作プログラムを書き込んでSwitchと繋げる事で自動操作を実現します。
ELEGOO arduino用ジャンパーワイヤー
こちらはマイコンをDFUモードにする際に使用します。
Nintendo Switch 3In1 Type-C to HDMI変換アダプタ
Switchのドックを使わずにマイコンと本体を接続するための変換アダプタとなります。
ドック経由の接続はとてもめんどくさい点と、ドックを使わずにHDMI経由でテレビモードにする事も出来るので買っておいて損はないです。
crosspack-avrの準備
まずはcrosspack-avrをhomebrew caskからインストールしましょう。
==> Downloading https://www.obdev.at/downloads/crosspack/CrossPack-AVR-20131216.dmg
==> Downloading from https://www.obdev.at/ftp/pub/Products/crosspack/CrossPack-AVR-20131216.dmg
######################################################################## 100.0%
==> Verifying SHA-256 checksum for Cask 'crosspack-avr'.
==> Installing Cask crosspack-avr
==> Running installer for crosspack-avr; your password may be necessary.
==> Package installers may write to any location; options such as --appdir are ignored.
Password:
installer: Package name is CrossPack for AVR Development
installer: Installing at base path /
installer: The install was successful.
🍺  crosspack-avr was successfully installed!
インストールが完了したら、パスを通しておきましょう。
例:export PATH=$PATH:/usr/local/CrossPack-AVR/bin/
dfu-programmer
次はdfu-programmerをhomebrewでインストールします。
==> Installing dependencies for dfu-programmer: libusb and libusb-compat
==> Installing dfu-programmer dependency: libusb
==> Downloading https://homebrew.bintray.com/bottles/libusb-1.0.23.mojave.bottle.tar.gz
######################################################################## 100.0%
==> Pouring libusb-1.0.23.mojave.bottle.tar.gz
🍺  /usr/local/Cellar/libusb/1.0.23: 29 files, 524.8KB
==> Installing dfu-programmer dependency: libusb-compat
==> Downloading https://homebrew.bintray.com/bottles/libusb-compat-0.1.5_1.mojave.bottle.tar.gz
######################################################################## 100.0%
==> Pouring libusb-compat-0.1.5_1.mojave.bottle.tar.gz
🍺  /usr/local/Cellar/libusb-compat/0.1.5_1: 14 files, 94.0KB
==> Installing dfu-programmer
==> Downloading https://homebrew.bintray.com/bottles/dfu-programmer-0.7.2.mojave.bottle.tar.gz
######################################################################## 100.0%
==> Pouring dfu-programmer-0.7.2.mojave.bottle.tar.gz
🍺  /usr/local/Cellar/dfu-programmer/0.7.2: 9 files, 107.2KB
こちらはパスを通さなくても大丈夫です。
自動操作用のソースをGithubからダウンロード
次に、実際に自動操作するためのソースを入手しましょう。
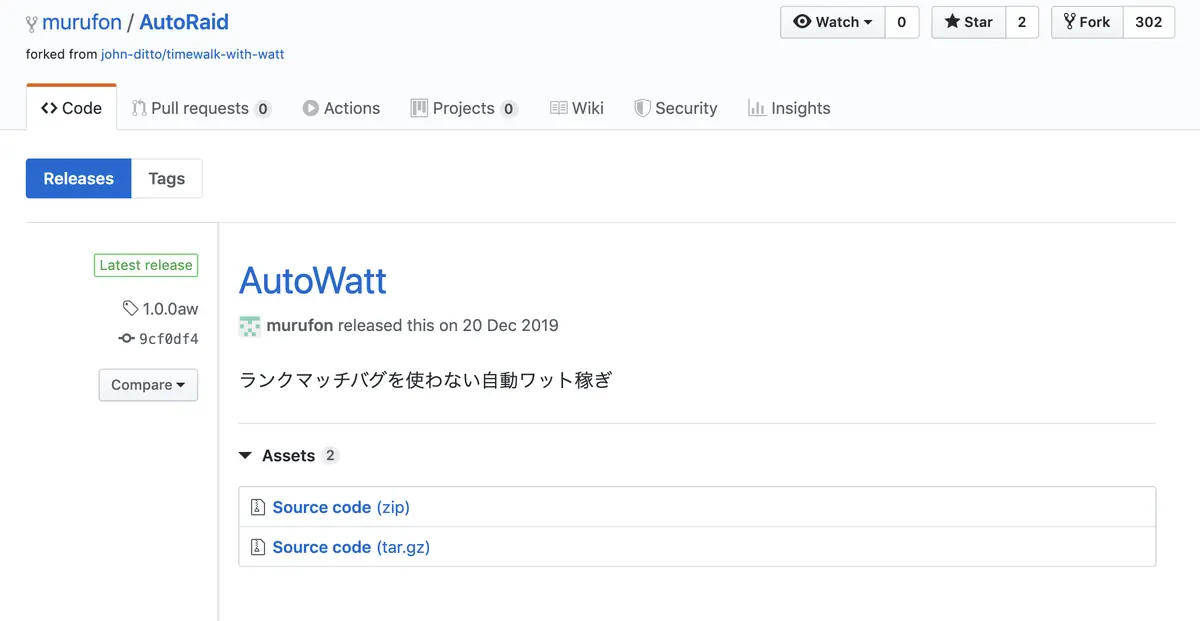
こちらからSource Code(Zip)をダウンロードし、任意のディレクトリに解凍しましょう。
次にこちらからZipをダウンロードし同じように解凍しましょう。
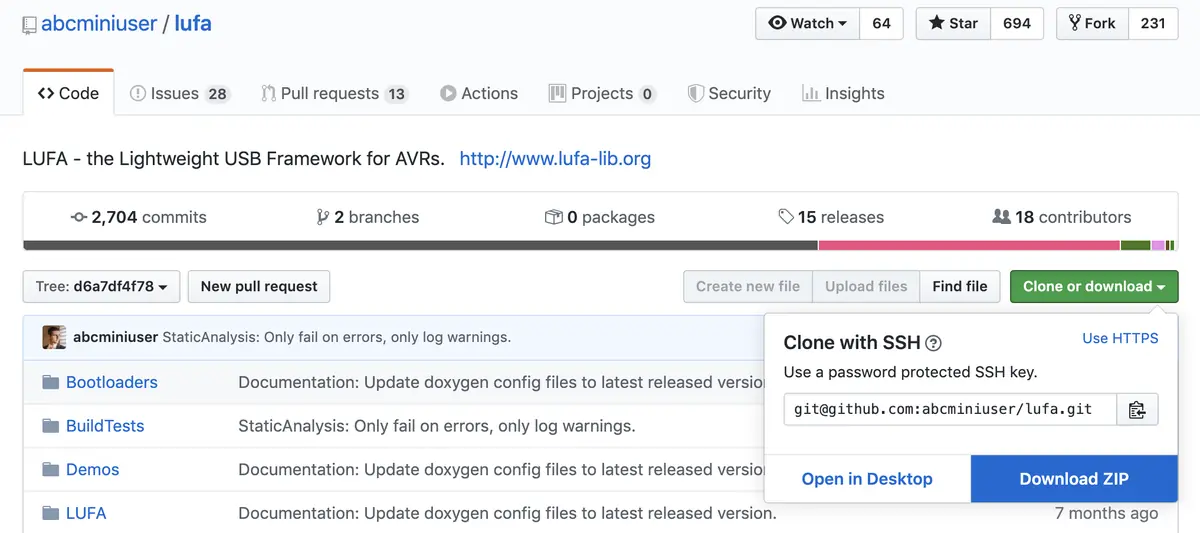
解凍をしたらlufaディレクトリが空になっていると思うので、ダウンロードしたlufaディレクトリの中身を全てコピーしましょう。
コピー後はこんな感じ。
.
├── Config
│   └── LUFAConfig.h
├── Descriptors.c
├── Descriptors.h
├── HORI_Descriptors
├── Joystick.c
├── Joystick.h
├── Joystick.hex
├── LUFA_LICENSE
├── README.md
├── lufa
│   ├── Bootloaders
│   ├── BuildTests
│   ├── Demos
│   ├── LUFA
│   ├── Maintenance
│   ├── Projects
│   ├── README.txt
│   └── makefile
└── makefile

8 directories, 12 files
ソースの修正
このままだと、古い状態のワットバグ(みんなで挑戦経由)での自動操作になっているので、ランクマッチを用いたもっと効率的な自動化に適応した自動操作に変えようと思います。
また、今回の自動操作の事前準備として、
- ランクマッチを一回以上終わっている事
- ローカル通信にしている事
- ねがいのかけらを投げ入れている事
- ポケモンの巣の目の前にいる事
- 本体の時計をOFFにしている事
上記の準備が完了している状態で自動操作を開始することを想定しています。
ソース自体はほとんど一緒ですが、とりあえず以下をそのままコピペしてしまって構いません。
/*
Nintendo Switch Fightstick - Proof-of-Concept

Based on the LUFA library's Low-Level Joystick Demo
    (C) Dean Camera
Based on the HORI's Pokken Tournament Pro Pad design
    (C) HORI

This project implements a modified version of HORI's Pokken Tournament Pro Pad
USB descriptors to allow for the creation of custom controllers for the
Nintendo Switch. This also works to a limited degree on the PS3.

Since System Update v3.0.0, the Nintendo Switch recognizes the Pokken
Tournament Pro Pad as a Pro Controller. Physical design limitations prevent
the Pokken Controller from functioning at the same level as the Pro
Controller. However, by default most of the descriptors are there, with the
exception of Home and Capture. Descriptor modification allows us to unlock
these buttons for our use.
*/

#include "Joystick.h"

typedef enum {
  UP,
  DOWN,
  LEFT,
  RIGHT,
  UPLEFT,     // UP + LEFT
  UPRIGHT,
  DOWNLEFT,
  DOWNRIGHT,
  HOLD_UP,    // Hold L Stick UP
  HOLD_DOWN,  // using duration = 0
  HOLD_LEFT,
  HOLD_RIGHT,
  HOLD_CLEAR, // clear Hold L Stick = center
  HOLD_CAM_L, // Hold R Stick Left
  HOLD_CAM_R, // Hold R Stick Right
  HOLD_CAM_C, // clear Hold R Stick = center
  HOLD_CAM_UP,// Hold R Stick Up
  X,
  Y,
  A,
  B,
  L,
  R,
  PLUS,
  HOME,
  H_LEFT,
  LOOP_START,
  NOTHING
} Buttons_t;

typedef struct {
  Buttons_t button;
  uint16_t duration;
} command;

static const command step[] = {
  // Setup controller
  { B,          0 },
  { A,          0 },
  // ここまでコントローラーを認識させるおまじない

  // Start

  // 初期設定など1回だけ動かしたいコードはここまで

  // loop Start
  { LOOP_START, 0 },
  // これより下を無限ループ

  // ワット回収(ワット回収済みであったとしても元に戻る)
  { A,          5 },
  { NOTHING,   30 },
  { B,          5 },
  { NOTHING,   30 },
  { B,          5 },
  { NOTHING,   30 },
  { B,          5 },
  { NOTHING,   50 },

  // 設定変更
  { HOME,       5 },
  { NOTHING,   15 },
  { DOWN,       5 },
  { NOTHING,    5 },
  { RIGHT,      5 },
  { NOTHING,    5 },
  { RIGHT,      5 },
  { NOTHING,    5 },
  { RIGHT,      5 },
  { NOTHING,    5 },
  { RIGHT,      5 },
  { NOTHING,    5 },
  { A,          5 }, // 設定を押す
  { NOTHING,    5 },
  { DOWN,       5 },
  { DOWN,       5 },
  { DOWN,       5 },
  { DOWN,       5 },
  { DOWN,       5 },
  { DOWN,       5 },
  { DOWN,       5 },
  { DOWN,       5 },
  { DOWN,       5 },
  { DOWN,       5 },
  { DOWN,       5 },
  { DOWN,       5 },
  { DOWN,       5 },
  { DOWN,       5 },
  { NOTHING,   15 },
  { A,          5 }, // 設定>本体を押す
  { NOTHING,    5 },
  { DOWN,       5 },
  { NOTHING,    5 },
  { DOWN,       5 },
  { NOTHING,    5 },
  { DOWN,       5 },
  { NOTHING,    5 },
  { DOWN,       5 },
  { NOTHING,    5 },
  { A,          5 }, // 日付と時刻を押す
  { NOTHING,    5 },
  { DOWN,       5 },
  { NOTHING,    5 },
  { DOWN,       5 },
  { NOTHING,    5 },
  { A,          5 }, // 現在の日付と時刻を押す
  { NOTHING,   15 },
  { RIGHT,      5 },
  { NOTHING,    5 },
  { RIGHT,      5 },
  { UP,         5 }, // 日付を1つ増やす
  { NOTHING,   15 },
  { RIGHT,      5 },
  { NOTHING,    5 },
  { RIGHT,      5 },
  { NOTHING,    5 },
  { RIGHT,      5 },
  { NOTHING,   15 },
  { A,          5 }, // OKを押す
  { NOTHING,   30 },
  { HOME,       5 }, // HOMRに戻る
  { NOTHING,   30 },
  { HOME,       5 }, // ゲームに戻る
  { NOTHING,   30 },
};

// Main entry point.
int main(void) {
  // We'll start by performing hardware and peripheral setup.
  SetupHardware();
  // We'll then enable global interrupts for our use.
  GlobalInterruptEnable();
  // Once that's done, we'll enter an infinite loop.
  for (;;)
  {
    // We need to run our task to process and deliver data for our IN and OUT endpoints.
    HID_Task();
    // We also need to run the main USB management task.
    USB_USBTask();
  }
}

// Configures hardware and peripherals, such as the USB peripherals.
void SetupHardware(void) {
  // We need to disable watchdog if enabled by bootloader/fuses.
  MCUSR &= ~(1 << WDRF);
  wdt_disable();

  // We need to disable clock division before initializing the USB hardware.
  clock_prescale_set(clock_div_1);
  // We can then initialize our hardware and peripherals, including the USB stack.

  #ifdef ALERT_WHEN_DONE
  // Both PORTD and PORTB will be used for the optional LED flashing and buzzer.
  #warning LED and Buzzer functionality enabled. All pins on both PORTB and \
           PORTD will toggle when printing is done.
  DDRD  = 0xFF; //Teensy uses PORTD
  PORTD =  0x0;
                  //We'll just flash all pins on both ports since the UNO R3
  DDRB  = 0xFF; //uses PORTB. Micro can use either or, but both give us 2 LEDs
  PORTB =  0x0; //The ATmega328P on the UNO will be resetting, so unplug it?
  #endif
  // The USB stack should be initialized last.
  USB_Init();
}

// Fired to indicate that the device is enumerating.
void EVENT_USB_Device_Connect(void) {
  // We can indicate that we're enumerating here (via status LEDs, sound, etc.).
}

// Fired to indicate that the device is no longer connected to a host.
void EVENT_USB_Device_Disconnect(void) {
  // We can indicate that our device is not ready (via status LEDs, sound, etc.).
}

// Fired when the host set the current configuration of the USB device after enumeration.
void EVENT_USB_Device_ConfigurationChanged(void) {
  bool ConfigSuccess = true;

  // We setup the HID report endpoints.
  ConfigSuccess &= Endpoint_ConfigureEndpoint(JOYSTICK_OUT_EPADDR, EP_TYPE_INTERRUPT, JOYSTICK_EPSIZE, 1);
  ConfigSuccess &= Endpoint_ConfigureEndpoint(JOYSTICK_IN_EPADDR, EP_TYPE_INTERRUPT, JOYSTICK_EPSIZE, 1);

  // We can read ConfigSuccess to indicate a success or failure at this point.
}

// Process control requests sent to the device from the USB host.
void EVENT_USB_Device_ControlRequest(void) {
  // We can handle two control requests: a GetReport and a SetReport.

  // Not used here, it looks like we don't receive control request from the Switch.
}

// Process and deliver data from IN and OUT endpoints.
void HID_Task(void) {
  // If the device isn't connected and properly configured, we can't do anything here.
  if (USB_DeviceState != DEVICE_STATE_Configured)
    return;

  // We'll start with the OUT endpoint.
  Endpoint_SelectEndpoint(JOYSTICK_OUT_EPADDR);
  // We'll check to see if we received something on the OUT endpoint.
  if (Endpoint_IsOUTReceived())
  {
    // If we did, and the packet has data, we'll react to it.
    if (Endpoint_IsReadWriteAllowed())
    {
      // We'll create a place to store our data received from the host.
      USB_JoystickReport_Output_t JoystickOutputData;
      // We'll then take in that data, setting it up in our storage.
      while(Endpoint_Read_Stream_LE(&JoystickOutputData, sizeof(JoystickOutputData), NULL) != ENDPOINT_RWSTREAM_NoError);
      // At this point, we can react to this data.

      // However, since we're not doing anything with this data, we abandon it.
    }
    // Regardless of whether we reacted to the data, we acknowledge an OUT packet on this endpoint.
    Endpoint_ClearOUT();
  }

  // We'll then move on to the IN endpoint.
  Endpoint_SelectEndpoint(JOYSTICK_IN_EPADDR);
  // We first check to see if the host is ready to accept data.
  if (Endpoint_IsINReady())
  {
    // We'll create an empty report.
    USB_JoystickReport_Input_t JoystickInputData;
    // We'll then populate this report with what we want to send to the host.
    GetNextReport(&JoystickInputData);
    // Once populated, we can output this data to the host. We do this by first writing the data to the control stream.
    while(Endpoint_Write_Stream_LE(&JoystickInputData, sizeof(JoystickInputData), NULL) != ENDPOINT_RWSTREAM_NoError);
    // We then send an IN packet on this endpoint.
    Endpoint_ClearIN();
  }
}

int find_loop_start_step(void){
  for(int i=0;i<(int)(sizeof(step)/sizeof(step[0]))-1;i++){
    if(step[i].button==LOOP_START) return i;
  }
  return 0;
}

typedef enum {
  SYNC_CONTROLLER,
  BREATHE,
  PROCESS,
} State_t;
State_t state = SYNC_CONTROLLER;

#define ECHOES 2
int echoes = 0;
USB_JoystickReport_Input_t last_report;

int report_count = 0;
int hold_LX = STICK_CENTER;
int hold_LY = STICK_CENTER;
int hold_RX = STICK_CENTER;
int hold_RY = STICK_CENTER;
int bufindex = 0;
int duration_count = 0;
int loop_start_step = 0;

void GetNextReport(USB_JoystickReport_Input_t* const ReportData) {
  // Prepare an empty report
  memset(ReportData, 0, sizeof(USB_JoystickReport_Input_t));
  ReportData->LX = STICK_CENTER;
  ReportData->LY = STICK_CENTER;
  ReportData->RX = STICK_CENTER;
  ReportData->RY = STICK_CENTER;
  ReportData->HAT = HAT_CENTER;

  //Hold stick
  ReportData->LX = hold_LX;
  ReportData->LY = hold_LY;
  ReportData->RX = hold_RX;
  ReportData->RY = hold_RY;

  // Repeat ECHOES times the last report
  if (echoes > 0)
  {
    memcpy(ReportData, &last_report, sizeof(USB_JoystickReport_Input_t));
    echoes--;
    return;
  }

  // States and moves management
  switch (state)
  {
    case SYNC_CONTROLLER:
			loop_start_step = find_loop_start_step();
			state = PROCESS;
      break;

    case PROCESS:
      switch (step[bufindex].button)
      {
        case UP:
          ReportData->LY = STICK_MIN;
          break;

        case LEFT:
          ReportData->LX = STICK_MIN;
          break;

        case DOWN:
          ReportData->LY = STICK_MAX;
          break;

        case RIGHT:
          ReportData->LX = STICK_MAX;
          break;

        case UPLEFT:
          ReportData->LY = STICK_MIN;
          ReportData->LX = STICK_MIN;
          break;

        case UPRIGHT:
          ReportData->LY = STICK_MIN;
          ReportData->LX = STICK_MAX;
          break;

        case DOWNLEFT:
          ReportData->LY = STICK_MAX;
          ReportData->LX = STICK_MIN;
          break;

        case DOWNRIGHT:
          ReportData->LY = STICK_MAX;
          ReportData->LX = STICK_MAX;
          break;

        case HOLD_UP:
          hold_LY = STICK_MIN;
          break;

        case HOLD_LEFT:
          hold_LX = STICK_MIN;
          break;

        case HOLD_DOWN:
          hold_LY = STICK_MAX;
          break;

        case HOLD_RIGHT:
          hold_LX = STICK_MAX;
          break;

        case HOLD_CLEAR:
          hold_LX = STICK_CENTER;
          hold_LY = STICK_CENTER;
          break;

        case HOLD_CAM_L:
          hold_RX = STICK_MIN;
          break;

        case HOLD_CAM_R:
          hold_RX = STICK_MAX;
          break;

        case HOLD_CAM_C:
          hold_RX = STICK_CENTER;
          hold_RY = STICK_CENTER;
          break;

        case HOLD_CAM_UP:
          hold_RY = STICK_MIN;
          break;

        case A:
          ReportData->Button |= SWITCH_A;
          break;

        case B:
          ReportData->Button |= SWITCH_B;
          break;

        case X:
          ReportData->Button |= SWITCH_X;
          break;

        case Y:
          ReportData->Button |= SWITCH_Y;
          break;

        case R:
          ReportData->Button |= SWITCH_R;
          break;

        case PLUS:
          ReportData->Button |= SWITCH_PLUS;
          break;

        case HOME:
          ReportData->Button |= SWITCH_HOME;
          break;

        case H_LEFT:
          ReportData->HAT = HAT_LEFT;
          break;

        default:
          break;
      }

    duration_count++;

    if (duration_count > step[bufindex].duration)
    {
      bufindex++;
      duration_count = 0;
    }


    if (bufindex > (int)( sizeof(step) / sizeof(step[0])) - 1)
    {
      bufindex = loop_start_step;
      duration_count = 0;
    }
  }

  // Prepare to echo this report
  memcpy(&last_report, ReportData, sizeof(USB_JoystickReport_Input_t));
  echoes = ECHOES;
}
コンパイル
ソースを修正したら、コンパイルを行います。
ソースファイルと同じディレクトリに移動し、makeコマンドを実行しましょう。
 [INFO]    : Begin compilation of project "Joystick"...

avr-gcc (GCC) 4.8.1
Copyright (C) 2013 Free Software Foundation, Inc.
This is free software; see the source for copying conditions.  There is NO
warranty; not even for MERCHANTABILITY or FITNESS FOR A PARTICULAR PURPOSE.

 [GCC]     : Compiling C file "Joystick.c"
avr-gcc -c -pipe -gdwarf-2 -g2 -mmcu=atmega16u2 -fshort-enums -fno-inline-small-functions -Wall -fno-strict-aliasing -funsigned-char -funsigned-bitfields -ffunction-sections -I. -DARCH=ARCH_AVR8 -DF_CPU=16000000UL -mrelax -fno-jump-tables -x c -Os -std=gnu99 -Wstrict-prototypes -DUSE_LUFA_CONFIG_HEADER -IConfig/  -I. -I./lufa/LUFA/.. -DARCH=ARCH_AVR8 -DBOARD=BOARD_NONE -DF_USB=16000000UL   -MMD -MP -MF obj/Joystick.d Joystick.c -o obj/Joystick.o
Joystick.c: In function 'GetNextReport':
Joystick.c:311:3: warning: enumeration value 'BREATHE' not handled in switch [-Wswitch]
   switch (state)
   ^
 [LNK]     : Linking object files into "Joystick.elf"
avr-gcc obj/Joystick.o obj/Descriptors.o obj/HIDParser.o obj/Device_AVR8.o obj/EndpointStream_AVR8.o obj/Endpoint_AVR8.o obj/Host_AVR8.o obj/PipeStream_AVR8.o obj/Pipe_AVR8.o obj/USBController_AVR8.o obj/USBInterrupt_AVR8.o obj/ConfigDescriptors.o obj/DeviceStandardReq.o obj/Events.o obj/HostStandardReq.o obj/USBTask.o -o Joystick.elf -lm -Wl,-Map=Joystick.map,--cref -Wl,--gc-sections -Wl,--relax -mmcu=atmega16u2
 [OBJCPY]  : Extracting HEX file data from "Joystick.elf"
avr-objcopy -O ihex -R .eeprom -R .fuse -R .lock -R .signature Joystick.elf Joystick.hex
 [OBJCPY]  : Extracting EEP file data from "Joystick.elf"
avr-objcopy -O ihex -j .eeprom --set-section-flags=.eeprom="alloc,load" --change-section-lma .eeprom=0 --no-change-warnings Joystick.elf Joystick.eep || exit 0
 [OBJCPY]  : Extracting BIN file data from "Joystick.elf"
avr-objcopy -O binary -R .eeprom -R .fuse -R .lock -R .signature Joystick.elf Joystick.bin
 [OBJDMP]  : Extracting LSS file data from "Joystick.elf"
avr-objdump -h -d -S -z Joystick.elf > Joystick.lss
 [NM]      : Extracting SYM file data from "Joystick.elf"
avr-nm -n Joystick.elf > Joystick.sym
 [SIZE]    : Determining size of "Joystick.elf"

avr-size --mcu=atmega16u2 --format=avr Joystick.elf
AVR Memory Usage
----------------
Device: atmega16u2

Program:    3888 bytes (23.7% Full)
(.text + .data + .bootloader)

Data:        266 bytes (52.0% Full)
(.data + .bss + .noinit)


 [INFO]    : Finished building project "Joystick".
[INFO] : Finished building project "Joystick".が出力されていれば正常にコンパイルが成功しJoystick.hexというファイルが生成されていると思います。
マイコンに書き込み
次はマイコンに書き込みます。
まずはジャンパーワイヤーを使い、マイコンをDFUモードで繋げれるようにしましょう。
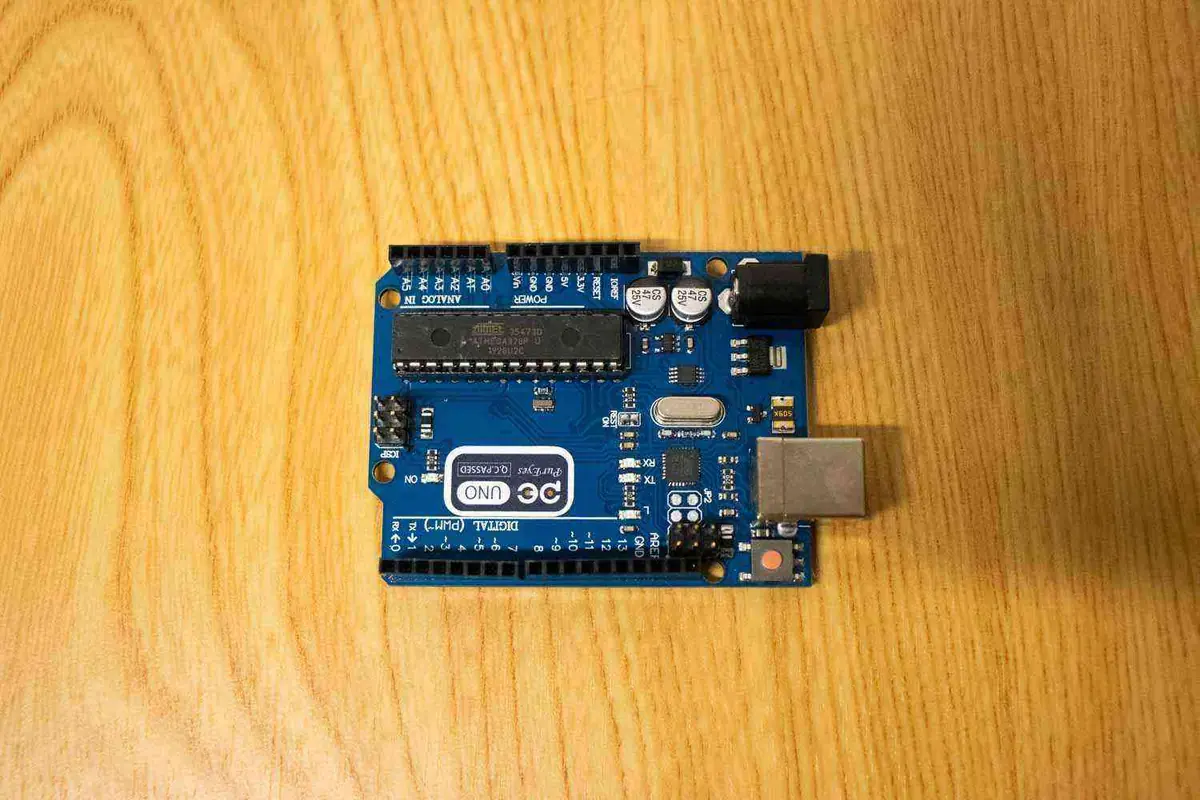
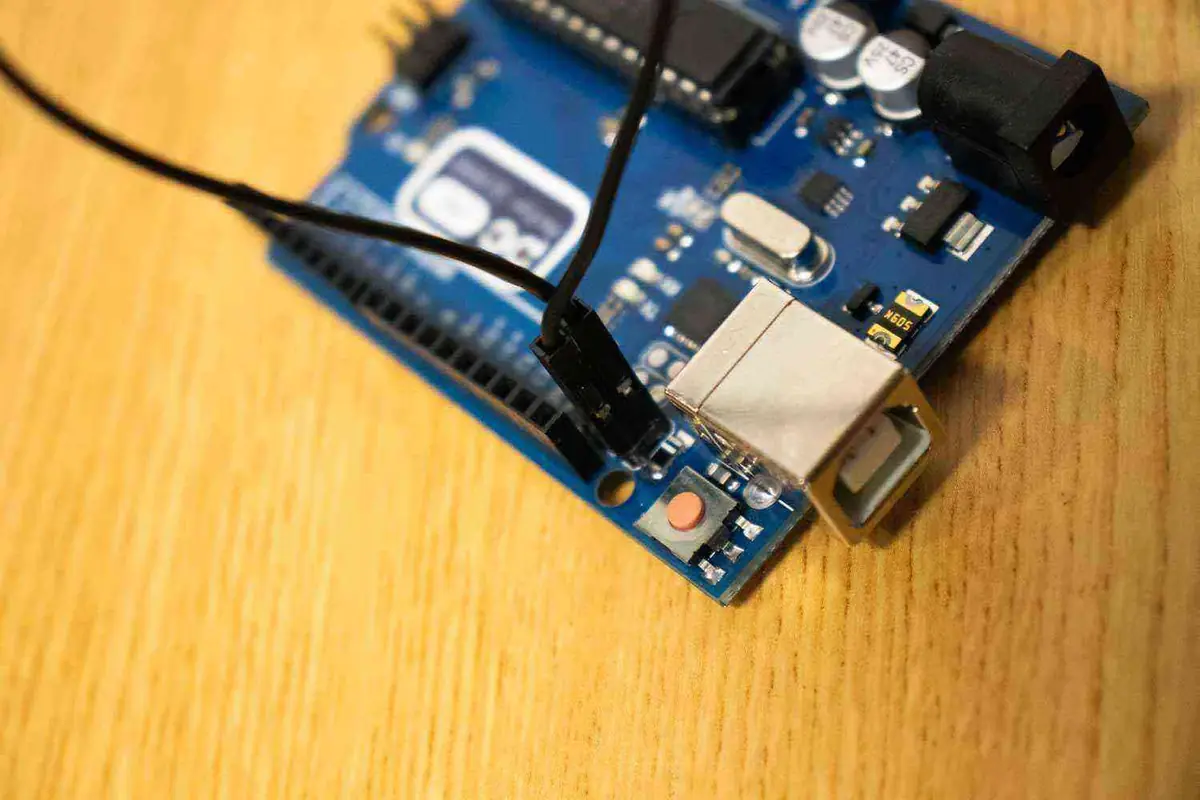
この状態で付属のUSBを使いPCに接続します。
接続し、ランプが点灯したらジャンパーワイヤーを取り外します。
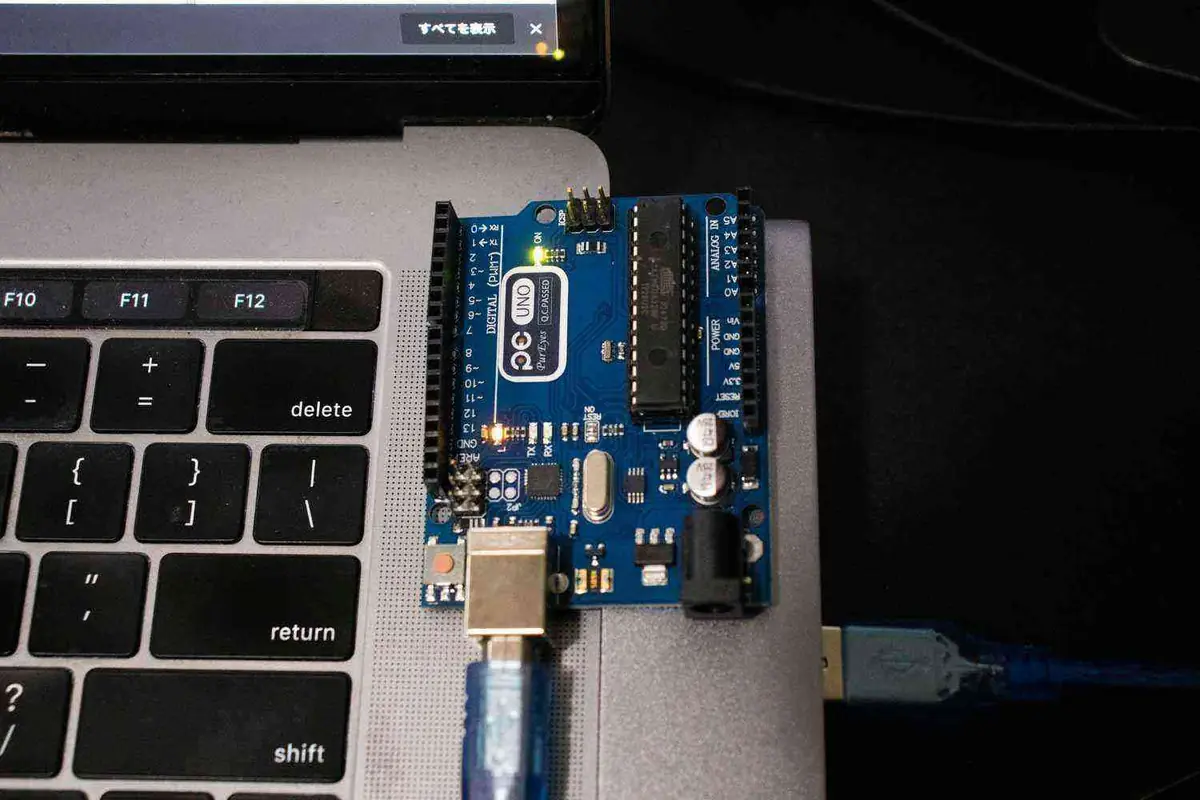
次に以下のコマンドを順番に実行してください。
Password:
Checking memory from 0x0 to 0x2FFF...  Not blank at 0x1.
Erasing flash...  Success
sudoコマンドなのでPCのパスワードを求められます。
正常に通ればマイコンに入っている既存プログラムを削除出来ます。
Checking memory from 0x0 to 0xF7F...  Empty.
0%                            100%  Programming 0xF80 bytes...
[>>>>>>>>>>>>>>>>>>>>>>>>>>>>>>>>]  Success
0%                            100%  Reading 0x3000 bytes...
[>>>>>>>>>>>>>>>>>>>>>>>>>>>>>>>>]  Success
Validating...  Success
0xF80 bytes written into 0x3000 bytes memory (32.29%).
これで正常に書き込みが成功しました。
最後にsudo dfu-programmer atmega16u2 resetを実行し書き込みを完了しましょう。
これで準備が完了しましたので、マイコンを取り外して大丈夫です。
自動操作開始
では、実際に自動操作をしてみましょう。
マイコンとSwitchをType-CのUSBケーブルで接続しましょう。
接続してから多少動くまでは準備処理が走っているため5秒くらい経過してから自動操作が始まります!
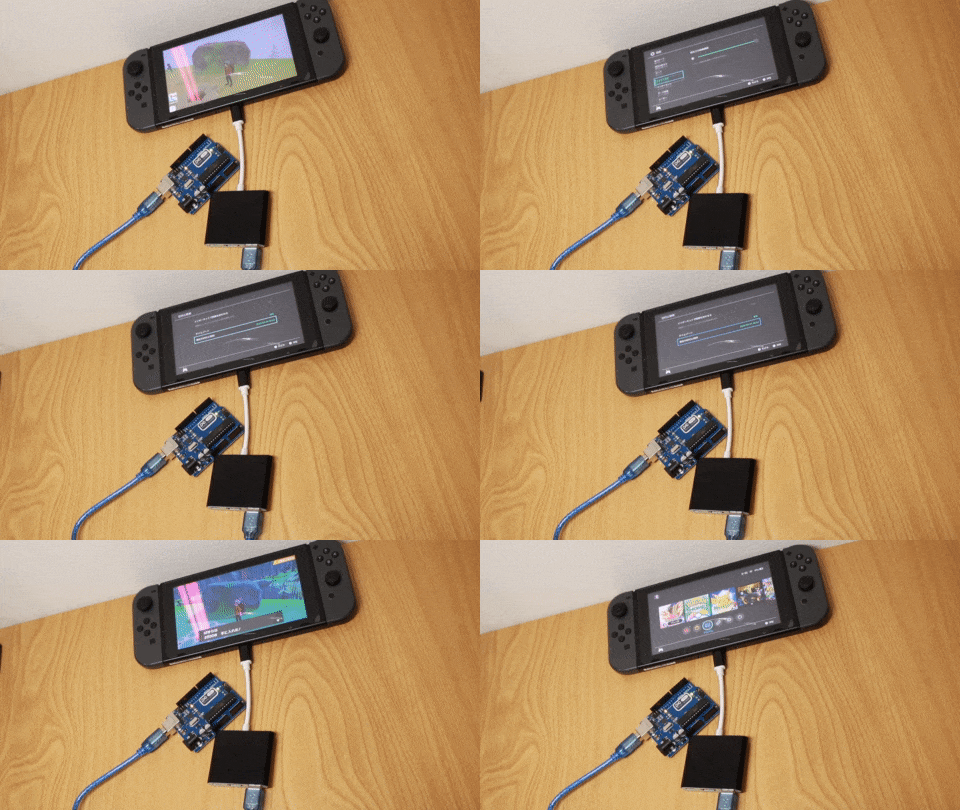
かがくの ちからって すげ〜!
終わりに
以上のように、規則性のある単純な作業であればマイコンを使う事で自動化をすることが可能になりました!
ポケモン剣盾だけではなく他のソフトでもJoystick.cのstep[]変数の中身を変えるだけで同じように自動化をすることが可能なので、気になる方はぜひ試してみてください♪